Can't find what you're looking for?
Start a conversation
Chat conversation only works if you have concented to all cookies. Modify your cookie settings here or send an email to team@twentythree.com
Now that you know how to get started with webinars, you can go ahead and customize both the registration page and the actual webinar room. The registration page is where visitors can learn more about the webinar and sign up to attend. Every time you create a new webinar, an auto-generated registration page is also created. To access and customize it, go to Customize Experience → Registration Page.
From this page, you can modify the information displayed when a visitor lands on it, ensuring that the first impression aligns with your brand and engages potential attendees.
While this article focuses on customizing the registration page, remember that you can also enhance the webinar room’s design or fine-tune the before-and-after webinar experience. Learn more about customizing the webinar room and tailoring the before and after webinar settings.

Content Tab: Adjusting Webinar Information
The Content tab allows you to modify key elements of the registration page, including:
All changes are reflected in real time, allowing you to see how your registration page will appear to visitors.
In this section, you can configure the registration form by selecting a webinar collector. Simply click next to the dropdown menu and choose your preferred collector. You can then customize the form’s headline and basic content. For further edits, click "Edit Sign-Up Form."
Below the registration form, you can also add and edit speaker profiles to introduce your presenters.
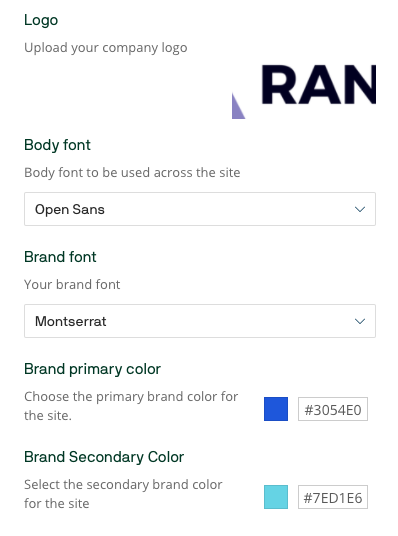
The Design tab enables you to ensure the registration page aligns with your brand identity. Only admins can make changes in this section, and updates will apply across your entire webinar hub.
Key customization options include:
By customizing the registration page, you enhance the attendee experience and reinforce your brand, making your webinar more engaging from the first touchpoint.